Powered by Blogger.

Search This Blog

How to add a Button in React Native - 360 Camera App

Hello Y'all, I've added a small section to my guide that shows how to add a button in React Native to the existing demo app availab...

Monday, July 17, 2023

How to add a Button in React Native - 360 Camera App

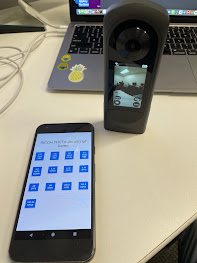
Hello Y'all, I've added a small section to my guide that shows how to add a button in React Native to the existing demo app available for the 360 cameras from RICOH. A guide with images, better navigation, and UI is available Here. To Code the Component called GetOptions my guide shows how to do that as well.

The code provided works with an API the emulates the 360 cameras so that you don't need to own one for development or for testing purposes.

Coding a Get Options Button

1. Add a Screen to Navigate to in App.tsx

In the App.tsx file, Import your GetOptions Custom Component and then Add a new React Stack Screen component as shown in the highlighted code. When the button is pressed it will Navigate to the new Stack Screen we created.

import React from 'react';
import {NavigationContainer} from '@react-navigation/native';
import {createNativeStackNavigator} from '@react-navigation/native-stack';
import MainMenu from './MainMenu';
import TakePhoto from './TakePhoto';
import ListPhotos from './ListPhotos';
import PhotoSphere from './PhotoSphere';
import GetOptions from './GetOptions';

const Stack = createNativeStackNavigator();

const screenOptions = {
  headerStyle: {
    backgroundColor: '#6200ee',
  },
  headerTintColor: '#fff',
  headerTitleStyle: {
    fontWeight: 'bold',
  },
  headerBackTitle: '',
};

const App = () => {
  return (
    <NavigationContainer>
      <Stack.Navigator screenOptions={screenOptions}>
        <Stack.Screen
          options={{title: 'Theta SDK Erik app'}}
          name="main"
          component={MainMenu}
        />
        <Stack.Screen
          options={{title: 'Get Options'}}
          name="options"
          component={GetOptions}
        />
        <Stack.Screen
          options={{title: 'Take Photo'}}
          name="take"
          component={TakePhoto}
        />
        <Stack.Screen
          options={{title: 'List Photos'}}
          name="list"
          component={ListPhotos}
        />
        <Stack.Screen
          options={{title: 'Sphere'}}
          name="sphere"
          component={PhotoSphere}
        />

      </Stack.Navigator>
    </NavigationContainer>
  );
};

export default App;

2. Add a Button in MainMenu.tsx

In the MainMenu component we create a goOptions() function that uses reacts navigation.navigate() to go to our options screen we created in App.tsx. This function is called below in a button press event.

In the return we add a View Style Component that just adds top spacing to our new button. Then we add the Button as a TouchableOpacity component, when the onPress event of the button happens our function goOptions is called.

import React from 'react';
import {StatusBar, Text, View, TouchableOpacity} from 'react-native';
import {SafeAreaView} from 'react-native-safe-area-context';
import styles from './Styles';
import {initialize} from 'theta-client-react-native';

const MainMenu = ({navigation}) => {
  const goTake = () => {
    navigation.navigate('take');
  };
  const goList = () => {
    navigation.navigate('list');
  };
  const goOptions = () => {
    navigation.navigate('options');
  }
  React.useEffect(() => {
    async function init() {
      //const endpoint = 'http://192.168.1.1'
      const endpoint = 'https://fake-theta.vercel.app' 
      const config = {
        // clientMode: { // Client mode authentication settings
        //   username: 'THETAXX12345678',
        //   password: '12345678',
        // }
      }
      await initialize(endpoint, config);
    }
    init();
  }, []);
  return (
    <SafeAreaView style={styles.container}>
      <StatusBar barStyle="light-content" />
      <TouchableOpacity style={styles.buttonBack} onPress={goTake}>
        <Text style={styles.button}>Take a Photo</Text>
      </TouchableOpacity>
      <View style={styles.spacer} />
      <TouchableOpacity style={styles.buttonBack} onPress={goList}>
        <Text style={styles.button}>List Photos</Text>
      </TouchableOpacity>
      <View style={styles.spacer} />
      <TouchableOpacity style={styles.buttonBack} onPress={goOptions}>
        <Text style={styles.button}>Get Options</Text>
      </TouchableOpacity>

    </SafeAreaView>
  );
};

export default MainMenu;

Get Options Code on Github


Published: By: Erik - July 17, 2023

Monday, May 29, 2023

Dump & Bake Recipes

Since, I'm not much of a cook, I wanted to find new recipes that would be good for a novice like me. Going to be updating this post as I find more recipes to share!

I have a criterion for which kind of recipes I'm going for:  

  1. Easy/Low-Effort to Cook
  2. Under $12
  3. Looks Tasty
  4. Lots of Leftovers
  5. Fast/Easy Cleanup

Luckily, there is a whole category of recipes that fit my criteria. They're called Dump & Bake recipes! The whole basis of them is that you have ingredients that can just be dumped into an oven dish and then bake. There are tons of these recipes online. Here's a couple I've found that I'm interested in making. 

1. Kielbasa and Cabbage

https://www.theseasonedmom.com/sausage-cabbage-dinner/

Uploaded image

 2. Air Fryer Dumplings

https://airfryerworld.com/air-fryer-frozen-dumplings-potstickers/

Can use an Air fryer or Oven

Air Fryer Frozen Dumpling, Potstickers, Gyoza, Wonton Recipe step by step photos

 3. Tater Tot Casserole

https://simplybeingmommy.com/2011/12/29/easy-tater-tot-casserole/

tater tot casserole with ground turkey recipe

If you have any recommendations, please comment below or just let me know your thoughts! Here is a blog post where I found some of these recipes from. https://blog.cheapism.com/cheap-dump-and-bake-recipes/

Published: By: Erik - May 29, 2023

Thursday, May 18, 2023

Reading Canvas Modules - Tip to Stay Focused


Audio Narrator

Usually, when I come across a required textbook, I make it a point to search for an audiobook version as it helps me maintain focus. However, when it comes to Canvas modules and the way teachers and professors present their lessons, the approach is slightly different. Fortunately, over the past few years, audio-text solutions have significantly improved.

Canvas Narrator

I find in Canvas that they have a text-audio solution but, it sounds kind of Robotic. You click on the "Immersive Reader" on the top right of a module.

Robot

By Default, when you press "Play" the narrator sounds like a Robot reading your text. For me, this doesn't help when I try to focus on the content and understanding of the module.

Settings 

The most natural sounding voice that I've found for English so far is the Female English (United Kingdom). In the settings, you can change it to this by clicking on the Top Right Book Icon. Below in the preferences you change the Language Translation to English UK, and make sure to click on the Document button otherwise it might not work.

That's pretty much it! This has helped me get through reading Modules because, immersive mode gets rid of any links or visuals, and reads to me the information that is written getting straight to the point.


Published: By: Erik - May 18, 2023

Saturday, May 13, 2023

First Post 360 Images


What is this photo above?

It's an equirectangular image. Never knew about those before my internship. It's supposed to form a 360 image when stitched together. Just like the photos you see in Virtual House Tours! 
 

Below is an Image when it is Stitched!


Published: By: Erik - May 13, 2023